Getting Started With Astro's Content Collection API
In this post we will go over how to use Astro’s content collections API in the simplest way as we build a static blog website that uses markdown files, tailwindcss and is deployed to Vercel.
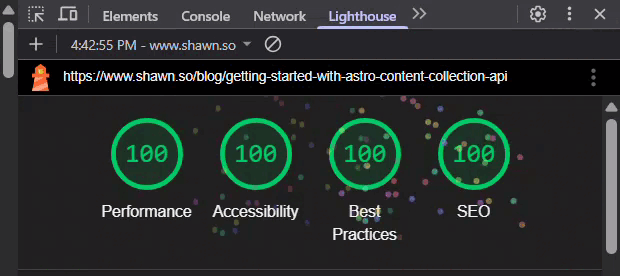
This is the same way I managed to get this blog up and running with perfect 100 out of 100 lighthouse score on all categories.
Overview
Here is what we will go over in this blog post:
- What is content collection and how to set it up for out blog posts
- How to render a list of our blog posts on the home page
- How to render a markdown file (MD or MDX) of our post on the
/blog/<slug>route - How to deploy our Astro blog to Vercel and add a custom domain to it
- We will take a look at some gotchas while working with Astro
- I will provide you with some good Astro templates that helped me get started with Astro
Initialize Astro Project
Before we start let’s initilize a fresh Astro project, in this guide I’ll use the Astro with tailwind template as well as React (though we don’t need it in this guide) and I initialized git, you can do the same with this single command:
npx create-astro@latest my-blog --template with-tailwindcss --install --add react --gitYou can initialize your Astro with a different settings by running this command and following the command prompts:
npx create-astro@latestSince were are using mdx files in this project the first thing we will do is add the mdx integration to our project by going to the astro.config.mjs file and adding the following:
// @ts-check
import { defineConfig } from "astro/config";
import tailwindcss from "@tailwindcss/vite";

import react from "@astrojs/react";
+ import mdx from "@astrojs/mdx";

// https://astro.build/config
export default defineConfig({
  vite: {
    plugins: [tailwindcss()],
  },
  integrations: [
    react(),
+    mdx()
  ],
});
What is Content Collection?
Let’s first understand what is content collection in Astro.
Content collections in Astro are a type safe way to organize and manage content using a loader (where to get the data from, like API / markdown files / DB, etc..) and zod schemas (how the data must look like). This is perfect for our blog, we will load all the data from markdown files and define what the markdown’s frontmatter structure must look like for a post.
Defining New Content Collection
Let’s create a new file in the root of our src and name it content.config.ts, Astro automatically looks for this file to get the collections we will export out of it.
- Don’t worry about type errors, once we run the project for the first time Astro will create the types for us.
Now let’s define our blog collection like so:
// src/content.config.ts

import { glob } from "astro/loaders";
import { defineCollection, z } from "astro:content";

const blogCollection = defineCollection({
  /**
   * The glob function helps us get all the markdown files (md & mdx) from
   * the directory we store them at. in this case "src/data/blog"
   */
  loader: glob({ pattern: "**/*.{md,mdx}", base: "./src/data/blog" }),

  /**
   * We define a simple schema, requiring:
   *  - title - to make sure every page contains H1 tag for SEO and a11y
   *  - slug - what the slug in the URL would look like to access this post
   *  - date - date in which the post was published at
   */
  schema: z.object({
    title: z.string(),
    slug: z.string(),
    date: z.coerce.date(),
  }),
});

// we export our blogCollection with a key of "blog" which is how we will access it later
export const collections = {
  blog: blogCollection,
};
Create New Posts
Let’s create our first post, we will create it in the src/data/blog directory, since that’s the directory we pointed at in our blogCollection.
I’ll call my first post welcome.mdx and I’ll put some data that matches the schema we defined in our collection, like so:
---
title: "Welcome to My Blog"
slug: "welcome-to-my-blog"
date: "2023-05-01"
---

## Hello

World
You might want to create more then one post just so we can properly make sure everything works as expected.
Getting Posts From The Blog Collection
Showing Post List in The Homepage
Now we can pull our posts from the blog collection and render a list of our blog posts on the home page of our blog site, as you may know Astro’s routing system is a file based router that looks for its routes in the src/pages directory, so in order to edit our home page we need to edit our src/pages/index.astro file, so let’s edit it:
- Let’s start by getting our posts from the blog collection inside our home page component script (AKA frontmatter), like so:
import { getCollection } from "astro:content";

// getting the collection by the key we exported it with, in this case "blog"
const posts = await getCollection("blog");- Next in our body tag let’s remove everything and map our posts into a list of links, pointing each of them to
/blog/<slug>.
<body>
  <ul class="space-y-4 md:space-y-2">
    {
      posts.map(({ data }) => (
        <li>
          <a href={`/blog/${data.slug}`} class="underline text-blue-600">
            {data.title}
          </a>
        </li>
      ))
    }
  </ul>
</body>- Here’s how our
src/pages/index.astrofile should look like after these changes:
---
import "../styles/global.css";
import { getCollection } from "astro:content";

const posts = await getCollection("blog");
---

<html lang="en">
  <head>
    <meta charset="utf-8" />
    <meta name="viewport" content="width=device-width" />
    <link rel="icon" type="image/svg+xml" href="/favicon.svg" />
    <meta name="generator" content={Astro.generator} />
    <title>Astro + TailwindCSS</title>
  </head>

  <body>
    <ul class="space-y-4 md:space-y-2">
      {
        posts.map(({ data }) => (
          <li>
            <a href={`/blog/${data.slug}`} class="underline text-blue-600">
              {data.title}
            </a>
          </li>
        ))
      }
    </ul>
  </body>
</html>- Don’t worry about type errors, let’s run our server so the types will be generated, if you already ran the local server you might need to close it and run it again.
npm run dev- Now we can go to
localhost:4321and see our home page showing a list of our posts
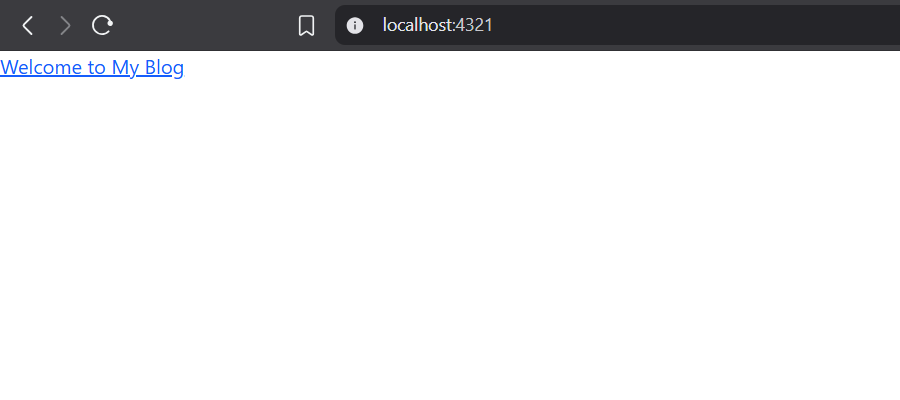
- You can add more blog posts markdown files in
src/data/blogto see that we are now rendering a list of our posts (you might need to re-run your server after adding markdown files to reflect the changes)
Rendering The Post Page
Now that we have our posts list showing in our homepage and linking to their respective /blog/<slug> route it’s time to actually implement that post page and render individual posts by slug.
- Let’s create our post page file inside our
src/pagesdirectory:blog/[...slug]/index.astro - Because we use static build for our website, Astro needs to know on build time all the possible routes for the post page (meaning all the possible slugs and their page content), so let’s do it with the
getStaticPathsfunction:
import {render, type CollectionEntry, getCollection } from "astro:content";

// typing out what's the props the page will get
export interface Props {
  post: CollectionEntry<"blog">;
}

export async function getStaticPaths() {
  // getting all the posts from the blog collection
  const posts = await getCollection("blog");

  /**
    * mapping the posts into the params that will be
    * present in the URL path for each post, and which
    * props will be passed to that page via `Astro.props`
    */
  const postResult = posts.map((post) => ({
    params: { slug: post.data.slug },
    props: { post },
  }));

  return postResult;
}- Now let’s get our props for the page, and use Astro’s
renderfunction in order to render the markdown into html, we will also import ourglobal.cssfile because we use tailwind, and we will render the post’s title in an h1 tag. - After all these changes our file should look like that:
---
// src/pages/blog/[...slug]/index.astro
import '../../../styles/global.css';
import {render, type CollectionEntry, getCollection } from "astro:content";
export interface Props {
post: CollectionEntry<"blog">;
}
export async function getStaticPaths() {
const posts = await getCollection("blog");
const postResult = posts.map((post) => ({
params: { slug: post.data.slug },
props: { post },
}));
return postResult;
}
/*
* here we get the props we exported in the above
* getStaticPaths function, based on the slug that's
* present in the current URL
*/
const { post } = Astro.props;
// we render the content of the MDX file into html
const { Content } = await render(post);
---
<article>
<h1>{post.data.title}</h1>
<Content />
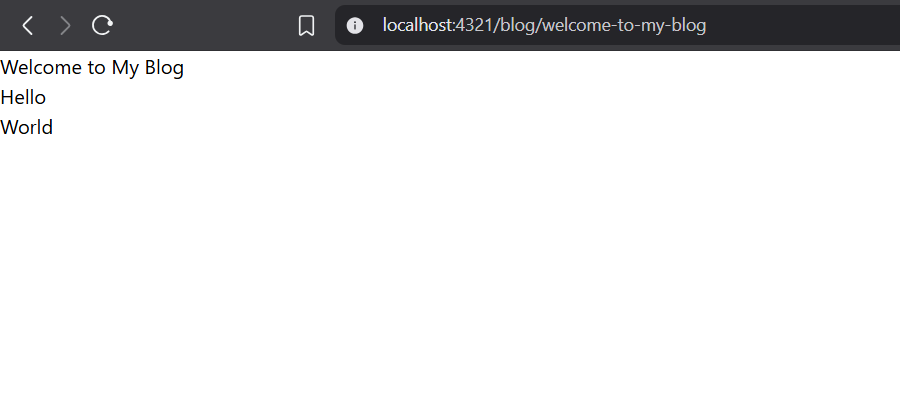
</article>🎉 Now we can navigate to any of our posts and see them render!
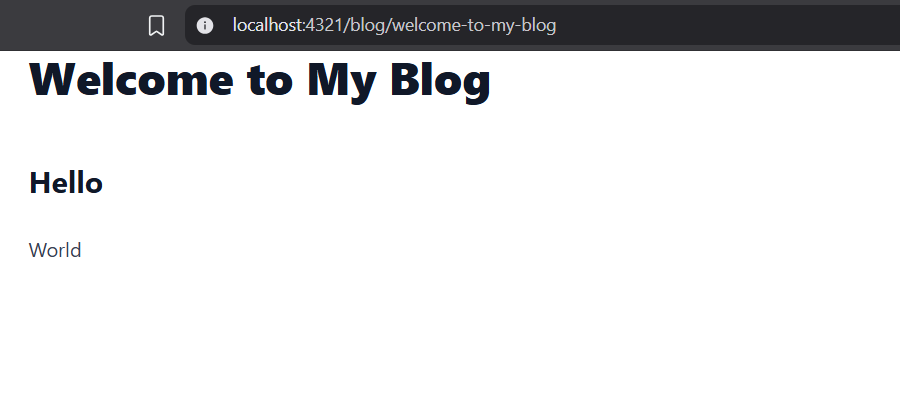
Add Default Styles to Markdown
At this point you’re looking at a post page that has no stylings at all, let’s add some default styles to it.
- Let’s install Tailwind Typography by running this command:
npm install -D @tailwindcss/typography- Let’s add the following import to our
src/styles/global.cssfile:
@plugin '@tailwindcss/typography';- And let’s add the typography classes to our post page, like so:
// src/pages/blog/[...slug]/index.astro
<article class="mx-auto max-w-3xl prose prose-a:text-blue-600">...</article>
Now we have styled markdown posts!
Deploying Our Blog To Vercel
Deploying our blog website to Vercel is no different than deploying any other project to Vercel, there’s just one extra step:
- Let’s add the Vercel adapter to our project by running the following command, it will ask to change our config to import the vercel adapter from
@astrojs/verceland to add it as an dapater to ourastro.config.mjsfile
npx astro add vercel- The easiest way to deploy a project to vercel is to first push it to github, let’s create new github repo and commit our changes and push it to github
- Once we have our github repo we can head over to Vercel and create new project in our dashboard and select our blog github repo from the list
- Vercel should automatically detect that you are using Astro and you can just hit the deploy button
- Within seconds you will have your Astro blog up and running!
- In your Vercel project’s settings you can head over to “Domains” and add your custom domain to your project and now it will be served via your custom domain.
Some Gotchas to Watch out For
-
If anything doesn’t work when running locally, first try to re-run the project
-
If that doesn’t help remove the node_modules folder and run again
-
If routes don’t show up in production or you get weird errors in production build like this one:
[ERROR] [vite] ✗ Build failed in 712ms
Could not resolve "..." from "..."
try to rename your markdown files and push the changes, for me even fresh build without cache didn’t help and only renaming and pushing and renaming back to the original name and pushing solved the issue.
Additional Astro Resources
Now that you have your own Astro blog deployed to the internet we can expand it with additional features, here’s a short list of things you need to do and explore in order to perfect your blog site, these resources and Astro templates helped me better understand Astro and build the website you are using right now.
- Add shadcn/ui to Astro
- Add custom 404 and 500 error pages to your Astro project
- Understand the key differences between NextJS and Astro
- Explore the AstroPaper template and the Astro Blog template, there you will find perfect production-ready implementation and conepts, like:
- How to add dynamic open-graph images to your blog post pages
- How to set up the meta tags correctly so you can get to 100% lighthouse SEO score
- Add header and footer to your site with minimal design
- Add light & dark mode themes for your site that will persist
- Add social media share links for your post page
- Expand the features in your rendered markdown content to add features like copy buttons to code snippets, ancher tags for headings, progress bar for your page and more.